Exploring LibreNMS
16 Apr 2023
In this article I will be exploring LibreNMS, implementing my own home lab version using Docker, I will provide guidance throughout my journey so you can follow along.
Lets start with, what is LibreNMS? well, its a free, fully featured network monitoring system (NMS) forked from Observium, features include:
- Auto discovery
- Alerting
- Multiple protocols data collection (STP, OSPF, BGP etc)
- VLAN, ARP and FDB table collection
- Customizable Dashboards
- Device Backup integration (Oxidized, RANCID)
- Distributed Polling
- NetFlow, sFlow, IPFIX (NfSen)
- Service monitoring (Nagios Plugins)
- Syslog (Integrated, Graylog)
- API
- Any much more…
Installation Methods
Installation guides are available on LibreNMS Docs, they have documented installation methods for:
Docker Install
A sample Docker compose files are provided here.
The services deployed:
- Relational database (mariadb)
- Key value store (redis)
- Minimal SMTP relay (msmtpd)
- LibreNMS
- LibreNMS (dispatcher)
- LibreNMS (syslogng)
- LibreNMS (snmptrapd)
Below is a copy and paste template with external volumes and expanded environment files, which can be used in Docker container management solutions such as Yacht or Portainer as a testing environment.
Initial running of this compose file will cost roughly 500 MB of memory and very little CPU, but of course this will increase as you use the system.
name: librenms

services:
  db:
    image: mariadb:10.5
    container_name: librenms_db
    command:
      - "mysqld"
      - "--innodb-file-per-table=1"
      - "--lower-case-table-names=0"
      - "--character-set-server=utf8mb4"
      - "--collation-server=utf8mb4_unicode_ci"
    volumes:
      - db:/var/lib/mysql
    environment:
      # varaiables expanded
      - "TZ=Europe/London"
      - "MYSQL_ALLOW_EMPTY_PASSWORD=yes"
      - "MYSQL_DATABASE=librenms"
      - "MYSQL_USER=librenms"
      - "MYSQL_PASSWORD=j6fPLBym"
    restart: always

  redis:
    image: redis:5.0-alpine
    container_name: librenms_redis
    environment:
      # varaiables expanded
      - "TZ=Europe/London"
    restart: always

  msmtpd:
    image: crazymax/msmtpd:latest
    container_name: librenms_msmtpd
    environment:
      # from msmtpd.env file
      - "SMTP_HOST=smtp.gmail.com"
      - "SMTP_PORT=587"
      - "SMTP_TLS=on"
      - "SMTP_STARTTLS=on"
      - "SMTP_TLS_CHECKCERT=on"
      - "SMTP_AUTH=on"
      - "SMTP_USER=foo"
      - "SMTP_PASSWORD=bar"
      - "[email protected]"
    restart: always

  librenms:
    image: librenms/librenms:latest
    container_name: librenms
    hostname: librenms
    cap_add:
      - NET_ADMIN
      - NET_RAW
    ports:
      # had to redirect port due to Portainer using 8000
      - target: 8000
        published: 8001
        protocol: tcp
    depends_on:
      - db
      - redis
      - msmtpd
    volumes:
      - librenms:/data
    environment:
      # varaiables expanded
      - "TZ=Europe/London"
      - "PUID=1000"
      - "PGID=1000"
      - "DB_HOST=db"
      - "DB_NAME=librenms"
      - "DB_USER=librenms"
      - "DB_PASSWORD=j6fPLBym"
      - "DB_TIMEOUT=60"
      # from librenms.env file
      - "MEMORY_LIMIT=256M"
      - "MAX_INPUT_VARS=1000"
      - "UPLOAD_MAX_SIZE=16M"
      - "OPCACHE_MEM_SIZE=128"
      - "REAL_IP_FROM=0.0.0.0/32"
      - "REAL_IP_HEADER=X-Forwarded-For"
      - "LOG_IP_VAR=remote_addr"
      - "CACHE_DRIVER=redis"
      - "SESSION_DRIVER=redis"
      - "REDIS_HOST=redis"
      - "LIBRENMS_SNMP_COMMUNITY=librenmsdocker"
      - "LIBRENMS_WEATHERMAP=false"
      - "LIBRENMS_WEATHERMAP_SCHEDULE=*/5 * * * *"
    restart: always

  dispatcher:
    image: librenms/librenms:latest
    container_name: librenms_dispatcher
    hostname: librenms-dispatcher
    cap_add:
      - NET_ADMIN
      - NET_RAW
    depends_on:
      - librenms
      - redis
    volumes:
      - librenms:/data
    environment:
      # varaiables expanded
      - "TZ=Europe/London"
      - "PUID=1000"
      - "PGID=1000"
      - "DB_HOST=db"
      - "DB_NAME=librenms"
      - "DB_USER=librenms"
      - "DB_PASSWORD=j6fPLBym"
      - "DB_TIMEOUT=60"
      - "DISPATCHER_NODE_ID=dispatcher1"
      - "SIDECAR_DISPATCHER=1"
      # from librenms.env file
      - "MEMORY_LIMIT=256M"
      - "MAX_INPUT_VARS=1000"
      - "UPLOAD_MAX_SIZE=16M"
      - "OPCACHE_MEM_SIZE=128"
      - "REAL_IP_FROM=0.0.0.0/32"
      - "REAL_IP_HEADER=X-Forwarded-For"
      - "LOG_IP_VAR=remote_addr"
      - "CACHE_DRIVER=redis"
      - "SESSION_DRIVER=redis"
      - "REDIS_HOST=redis"
      - "LIBRENMS_SNMP_COMMUNITY=librenmsdocker"
      - "LIBRENMS_WEATHERMAP=false"
      - "LIBRENMS_WEATHERMAP_SCHEDULE=*/5 * * * *"
    restart: always

  syslogng:
    image: librenms/librenms:latest
    container_name: librenms_syslogng
    hostname: librenms-syslogng
    cap_add:
      - NET_ADMIN
      - NET_RAW
    depends_on:
      - librenms
      - redis
    ports:
      - target: 514
        published: 514
        protocol: tcp
      - target: 514
        published: 514
        protocol: udp
    volumes:
      - librenms:/data
    environment:
      # varaiables expanded
      - "TZ=Europe/London"
      - "PUID=1000"
      - "PGID=1000"
      - "DB_HOST=db"
      - "DB_NAME=librenms"
      - "DB_USER=librenms"
      - "DB_PASSWORD=j6fPLBym"
      - "DB_TIMEOUT=60"
      - "SIDECAR_SYSLOGNG=1"
      # from librenms.env file
      - "MEMORY_LIMIT=256M"
      - "MAX_INPUT_VARS=1000"
      - "UPLOAD_MAX_SIZE=16M"
      - "OPCACHE_MEM_SIZE=128"
      - "REAL_IP_FROM=0.0.0.0/32"
      - "REAL_IP_HEADER=X-Forwarded-For"
      - "LOG_IP_VAR=remote_addr"
      - "CACHE_DRIVER=redis"
      - "SESSION_DRIVER=redis"
      - "REDIS_HOST=redis"
      - "LIBRENMS_SNMP_COMMUNITY=librenmsdocker"
      - "LIBRENMS_WEATHERMAP=false"
      - "LIBRENMS_WEATHERMAP_SCHEDULE=*/5 * * * *"
    restart: always

  snmptrapd:
    image: librenms/librenms:latest
    container_name: librenms_snmptrapd
    hostname: librenms-snmptrapd
    cap_add:
      - NET_ADMIN
      - NET_RAW
    depends_on:
      - librenms
      - redis
    ports:
      - target: 162
        published: 162
        protocol: tcp
      - target: 162
        published: 162
        protocol: udp
    volumes:
      - librenms:/data
    environment:
      # varaiables expanded
      - "TZ=Europe/London"
      - "PUID=1000"
      - "PGID=1000"
      - "DB_HOST=db"
      - "DB_NAME=librenms"
      - "DB_USER=librenms"
      - "DB_PASSWORD=j6fPLBym"
      - "DB_TIMEOUT=60"
      - "SIDECAR_SNMPTRAPD=1"
      # from librenms.env file
      - "MEMORY_LIMIT=256M"
      - "MAX_INPUT_VARS=1000"
      - "UPLOAD_MAX_SIZE=16M"
      - "OPCACHE_MEM_SIZE=128"
      - "REAL_IP_FROM=0.0.0.0/32"
      - "REAL_IP_HEADER=X-Forwarded-For"
      - "LOG_IP_VAR=remote_addr"
      - "CACHE_DRIVER=redis"
      - "SESSION_DRIVER=redis"
      - "REDIS_HOST=redis"
      - "LIBRENMS_SNMP_COMMUNITY=librenmsdocker"
      - "LIBRENMS_WEATHERMAP=false"
      - "LIBRENMS_WEATHERMAP_SCHEDULE=*/5 * * * *"
    restart: always

volumes:
  db:
  librenms:
Once the stack is up and running you can visit your docker host’s IP address on port 8001 (8000 for default installations). You’ll be asked to setup an administrative account, then the system will validate itself and notify you of any issues.
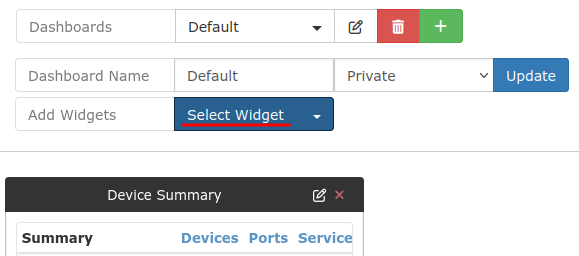
I like to start by adding a device summary to the default dashboard. Click the “Edit” button and from “Add Widgets” select “Device Summary” and “Alerts”.
Adding a device
Ping Only
There are two options to add devices, either via the command line interface (CLI) or the web interface, I will be focusing on performing all tasks via the web interface.
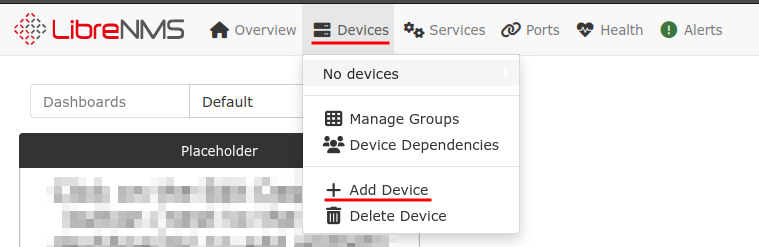
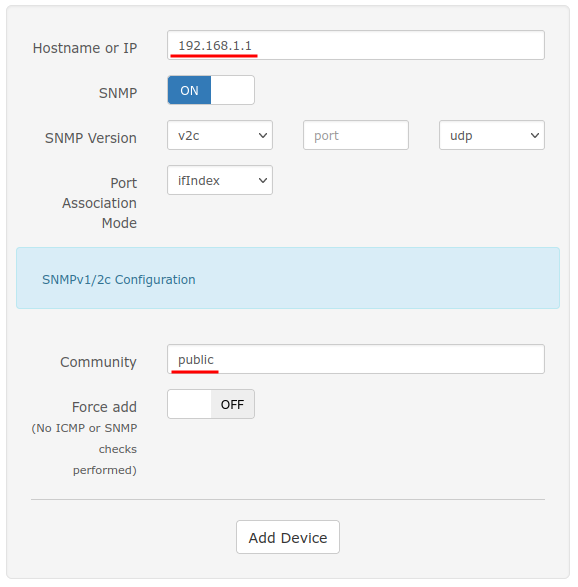
To add a new device via the web interface, go to “Devices” and select “Add Device”.
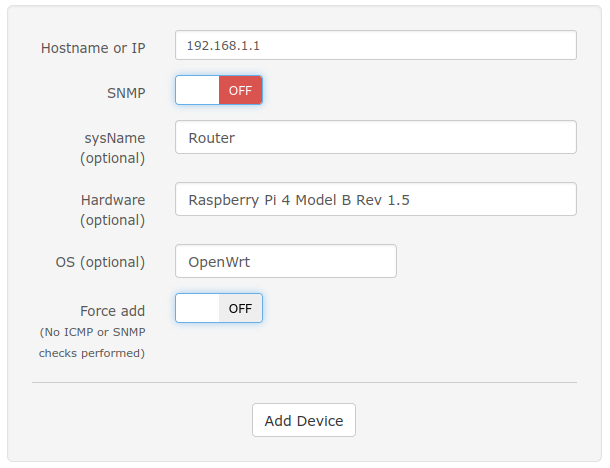
To add a ping only device, you’ll turn off the SNMP features and populate the appropriate fields, I have provided an example in the screenshot below.
Once the device has been added you can go back and edit the device for more options.
SNMP
SNMPD on devices
You may also need to install SNMPD on devices, again for Linux Debian family using apt.
sudo apt install -y snmpd
Then configure the conf file to enable on the correct interface
sudo nano /etc/snmp/snmpd.conf
agentaddress 192.168.1.1
Lastly you’ll need to configure your views, per default settings you will have limited access. The below code will create an “all” view and expose everything.
view	all	included	.1

rocommunity	public	default	-V	all
For projects such as OpenWRT, install snmpd then edit the configuration file.
opkg install snmpd

vi /etc/config/snmpd
SNMPwalk
A useful tool for troubleshooting is snmpwalk, to install on Linux Debian family issue the following command
sudo apt install -y snmp
Basic use of the tool
snmpwalk -v 2c -c public 192.168.1.1
LibreNMS
Now that we have some devices using SNMP we can add these to LibreNMS. To add a new device via the web interface, go to “Devices” and select “Add Device”.
Populate the appropriate fields, at a minimum you’ll need an hostname or IP address and community string. The default SNMP version will be 2c, with a protocol and port of UDP 161.
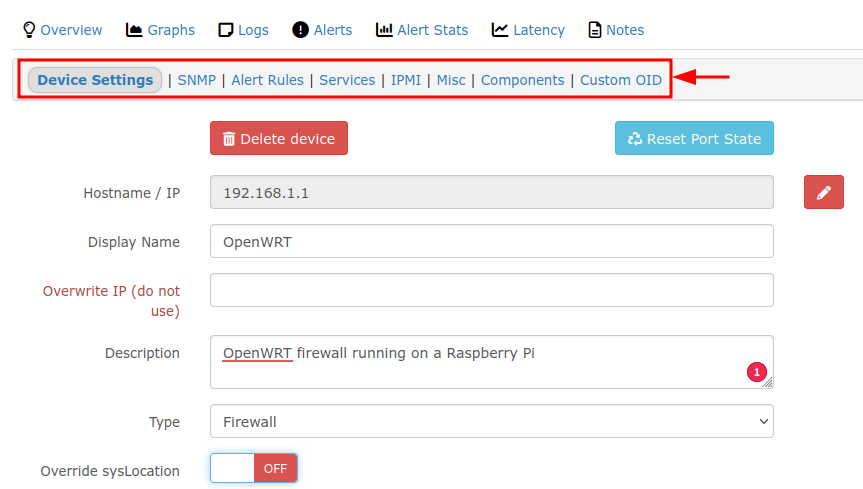
With the device successfully added, you can view all configured devices via the “Devices” tab. As shown in the screenshot below a new category of “Server” has been automatically added and the OpenWRT device has been detected.

Auto discovery
LibreNMS provides the ability to automatically add devices on your network. Discovery methods include:
-
ARP
-
XDP
-
OSPF
-
BGP
-
SNMP Scan
Read the official documentation to assist in getting this setup.
Applications
After you have added devices its worth reviewing their settings, LibreNMS has an “Applications” section, which allows us to configure applications for additional data collection, the example uses Pi-Hole.
After enabling you we can see additional information within the “Apps” tab, such as “Block Percentage”, which is a statistic available within Pi-Hole.

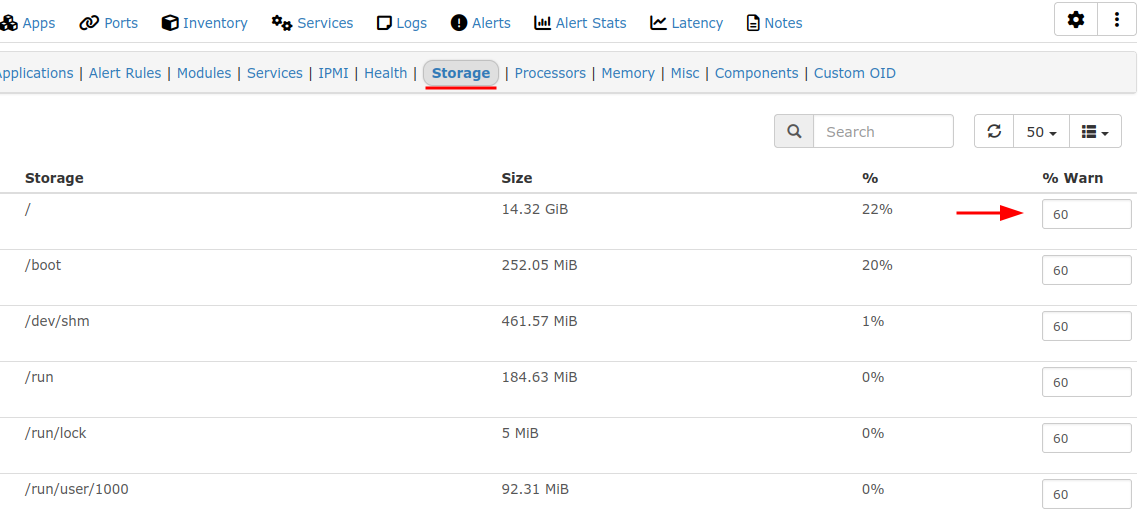
Storage
Continuing from Applications, the Storage tab will be populated, which will have a percentage warning configured, as shown in the screenshot below, this can be handy for notifications about OS disks or shares.
Temperature
Within the Health tab we can see additional information such as temperature, which can also notify when thresholds are reached, as shown in the screenshot below. This could be helpful with identifying systems with higher temperatures such as a Raspberry Pi, allowing us to provide better cooling and increase the device’s lifespan.

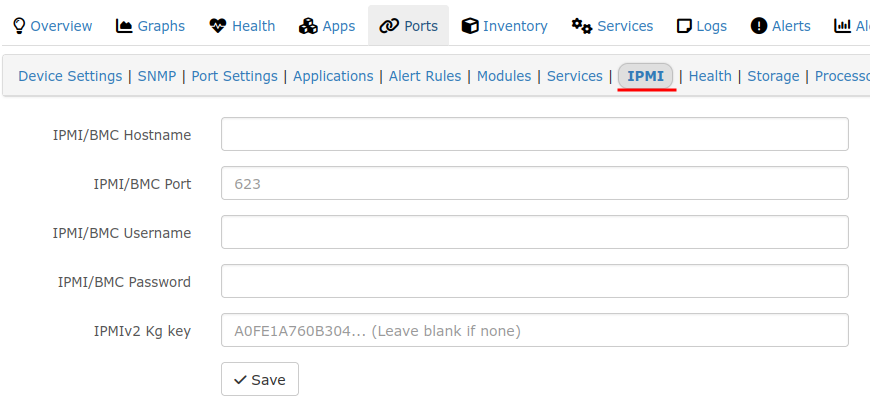
IPMI - iDrac, iLo
Lastly I would like to point out the IPMI tab. IPMI stands for Intelligent Platform Management Interface and is often found on enterprise grade servers, this is an embedded system which is used to manage the server hardware.
Although IPMI promoters are suggesting the use of more modern systems management interface such as DMTF’s Redfish standard.
LibreNMS can have this information configured, which enables more data collection.
Services
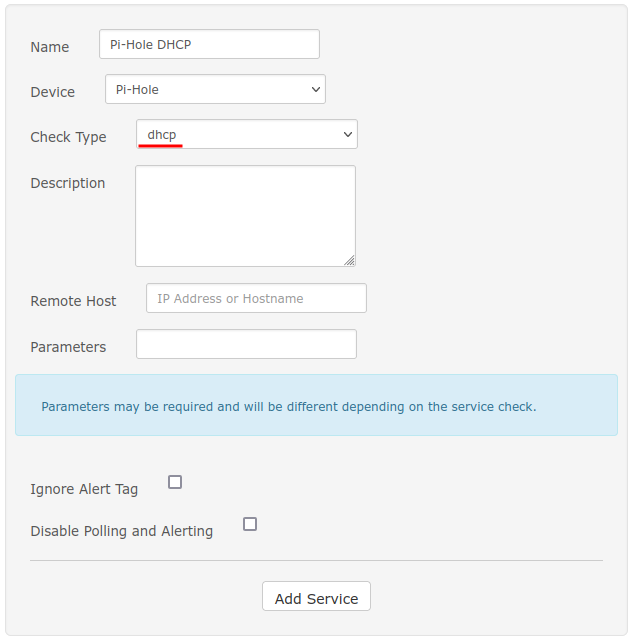
We may wish to monitor services running for example our on-premise DHCP server, this can be achieved from the “Services” tab.
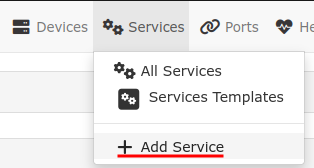
Add a new service to monitor, as shown in the screenshot below I have selected the device that hosts this service and have changed the check type to “DHCP”.
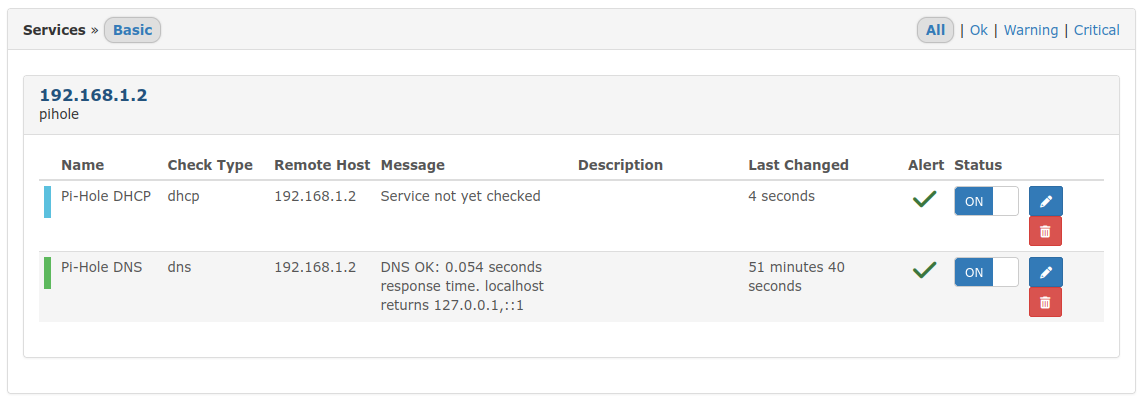
Once the service has been added it will take a while before it is checked. The screenshot below shows a service pending check and one that has already been checking.
The available check types are listed below:
- apt
- breeze
- by ssh
- clamd
- cluster
- dbi
- dhcp
- dig
- disk
- disk smb
- dns
- dummy
- file age
- flexlm
- ftp
- hpjd
- http
- icmp
- ide smart
- ifoperstatus
- ifstatus
- imap
- ircd
- jabber
- load
- log
- mailq
- mrtg
- mrtgtraf
- mysql
- mysql query
- nagios
- nntp
- nntps
- nt
- ntp
- ntp peer
- ntp time
- nwstat
- oracle
- overcr
- pgsql
- ping
- pop
- procs
- real
- rpc
- sensors
- simap
- smtp
- snmp
- spop
- ssh
- ssmtp
- swap
- tcp
- time
- udp
- ups
- uptime
- users
- wave
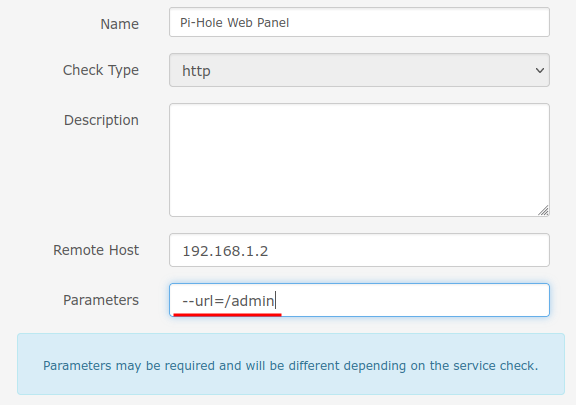
I also configured the HTTP service check for a few internal services, but you’ll need to add additional parameters for example different ports or URLs. Documentation for the Check_HTTP plugin
Example of additional parameters is my PiHole installation, which looks for the URL “http://pihole.local/admin/”, the normal HTTP check will fail with a 403 error code. Instead we need to add the URL parameter as shown in the screenshot below.
These additional parameters can be used to check for expiring certificates, these are all documented in the above the Check_HTTP plugin documentation.
--sni -S -p 443 -C 30 --continue-after-certificate
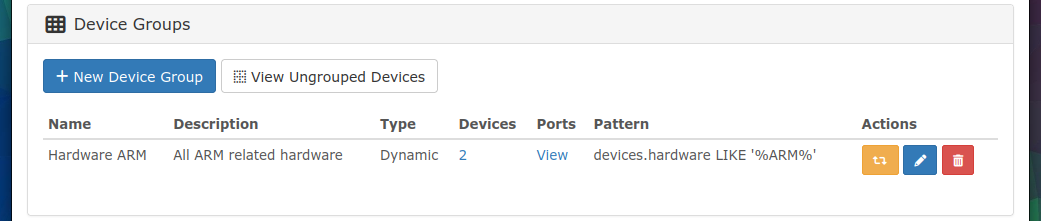
Grouping
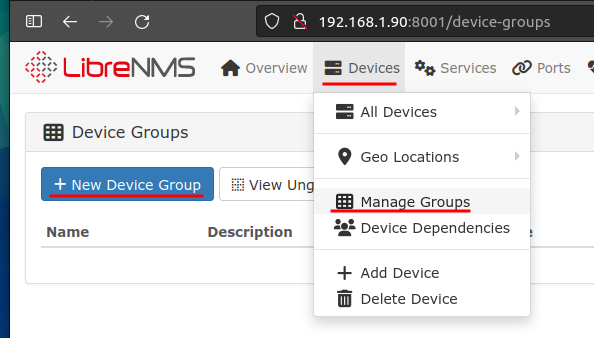
Groups have many uses in LibreNMS, one of those uses is to target our alerts.
Device groups can be found within the “Devices” tab.
In the example screenshot below I am creating a dynamic group based upon the devices hardware.
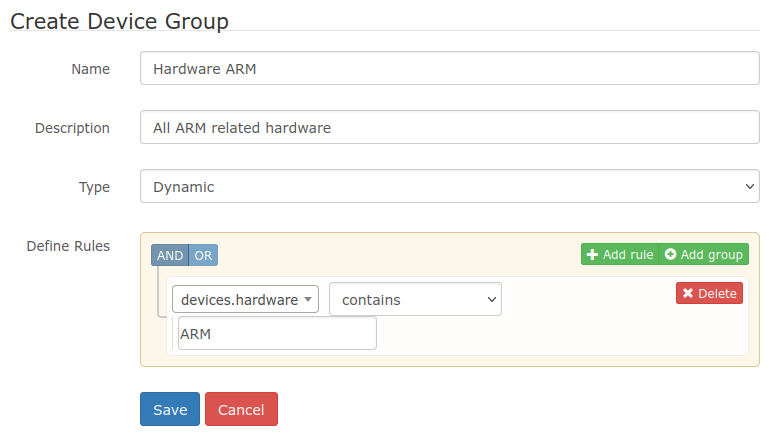
With the group created we can see how many devices have been captured by our queries.
Alerts
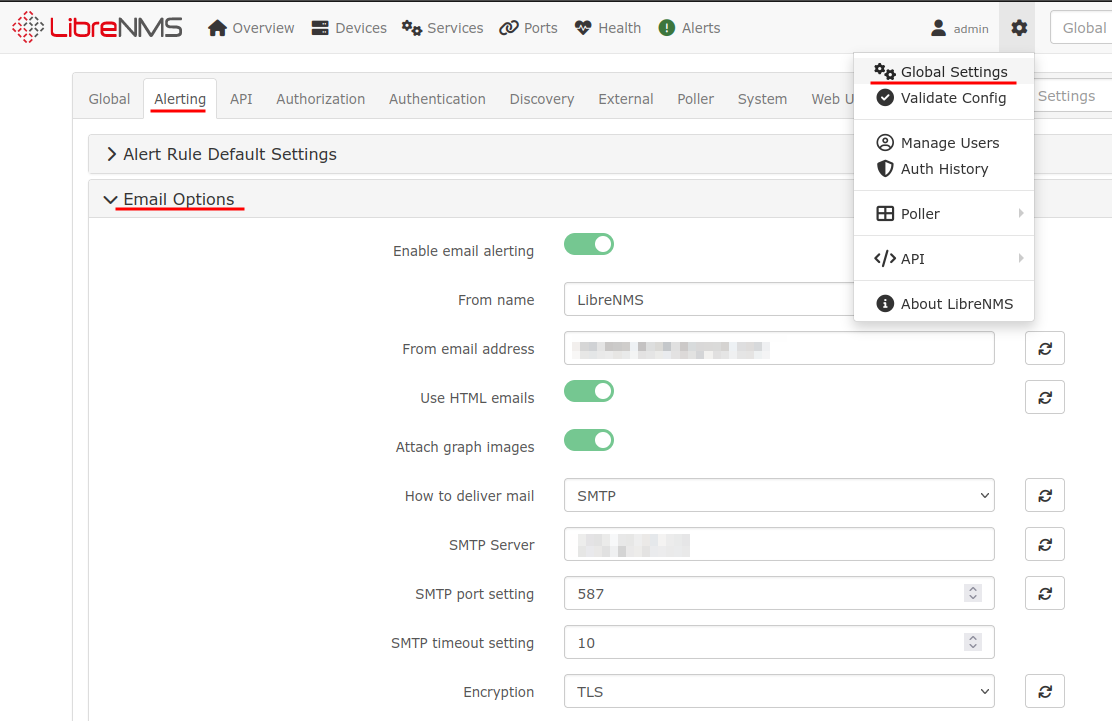
To enable email notifications you’ll need to navigate to “Global Settings” > “Alerting” > “Email Options” and configure to your requirements, this will allow us to send emails.
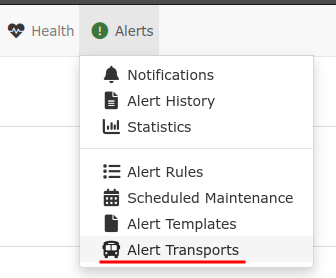
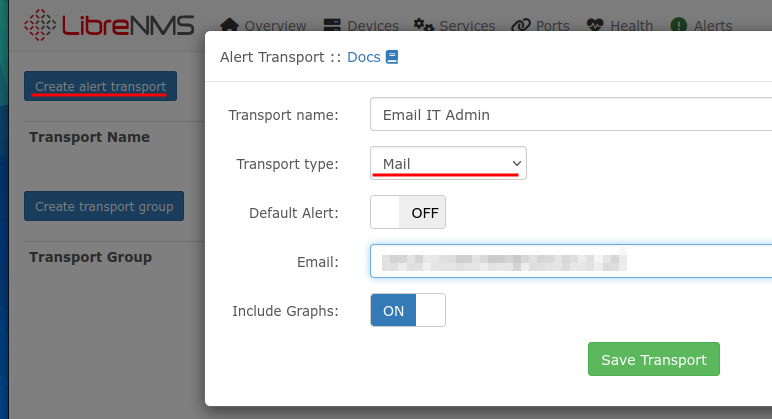
Next we can create Alert Transport, these are the methods of notification. From the Alerts tab select “Alert Transports”.
Create a new alert transport, select the “Mail” type and set the recipient address.
This will give us at least email notifications but drop lists comprises of:
- Alerta
- Alert Manager
- API
- Boxcar
- Browser Push
- Canopsis
- Cisco Spark
- Clickatell
- Discord
- Dummy
- Elasticsearch
- Gitlab
- Google Chat
- HipChat
- Hue
- IRC
- Jira
- Kayako
- LINE Notify
- Matrix
- Mattermost
- Microsoft Teams
- Nagios
- Opsgenie
- osTicket
- PagerDuty
- playSMS
- Pushbullet
- Pushover
- Rocket Chat
- Sensu
- Signal
- SignalWire
- Slack
- SMSEagle
- SMSfeedback
- Splunk
- Syslog
- Telegram
- Twilio
- UKFast PSS
- VictorOps
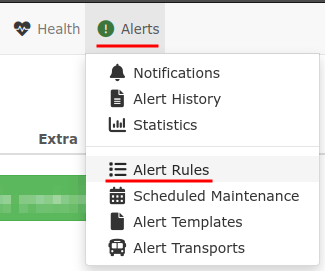
Now to create the alert rules, from the Alerts tab select “Alert Rules”.
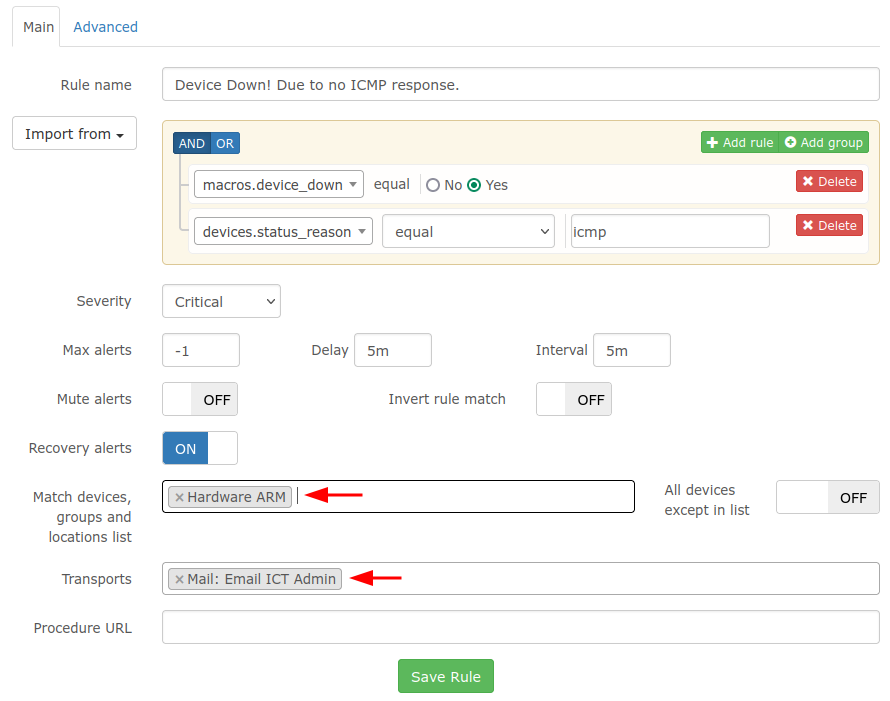
When we first click into “Alert Rules”, we are presented with a big button that states “Click here to create the default alert rules!”, if we click this it will create 12 rules that target all devices.

We can create new rules or edit the existing, in the screenshot below I have modified the “Device Down!” rule to show how groups can be used to match against devices and where to enable our alert transports.
At this point we have setup LibreNMS, with our devices, configured alerting and have a usable system, although very basic.
I encourage that you review the official documentation and the community forums as LibreNMS is a very capable system.