Home Server 2022 and Migration
07 Mar 2022
This article will cover my new 2022 home server deployment, including the hardware components and why I made this selection over others. I will then discuss important aspects of the server such as power saving features, updating firmware and resolving issues with vKVM viewer.
The article will continue with a fresh installation of Proxmox VE 7.1, configuring Proxmox CPU governors, interfaces to utilise LAG configuration, use of the community repository and creation of new ZFS disks.
As this is a migration for me, I will be discussing steps taken to migrate existing virtual machines and containers and then decommissioning the old clustered server.
Although this article is in chronological order, to consolidate its size I have separated it into smaller articles, such as installation and configuration of; Emby and other services.
The Proxmox VE Administration Guide is a great resource
Article Contents
Server
Hardware Components
Below is a list of components for the server:
- Chassis: 2U Chenbro RM238 Series - 12 LFF + 2 SFF
- Power Supply: 2 x 800W 80 Plus Platinum Hot Swap - FSP800-20ERM
- Motherboard: Gigabyte MD70-HB0 (Datto rebrand)
- CPU: 2 x Intel Xeon E5-2630Lv3 - 8 core (16 threads) 1.8 GHz
- Coolers: Intel Socket R Square ILM - BKT-0048L-RS Rev.B
- RAM: 2 x Samsung DDR4 32GB 2133Mhz ECC Registered Load Reduced
- SSD: Intel D3-S45110 Series Enterprise SSD
- 4 x 240 GB
- 2 x 480 GB
- HDD: 4 x 4 TB WD Red - SATA 64 MB Cache
- GPU: PNY Nvidia Quadro P620 2 GB
Reasons for purchase
The above components were either ones I already owned or purchased pre-loved. There was a strong focus on price point to reduce the initial up front cost, therefore the components are not the newest.
I have broken my reasons down into smaller sections below:
The chassis supports up to 12 LFF disks and 2 additional SFF disks on the back, a total of 14 disks in a 2U form factor. The front is connected via a backplane and managed by the integrated LSI SAS 3008 controller and the back two disks are managed by the integrated SATA controller. This means there is no requirement to flash the hardware RAID into IT mode and the motherboard is Red Hat certified hardware with the added bonus of dual 10 GbE (Gigabit Ethernet) for any future plans.
The chassis also has redundant power supplies, which is always nice to have redundancy in systems just in-case of a hardware failure, this provides us with time to order replacements and fit without downtime due to its hot-swap ability.
The CPUs were a decision of price, cores and TDP (the average power, in watts). Each processor provides 8 cores, 16 threads at 1.8 GHz with a TDP of 55 W, combined this is 16 cores and 32 threads.
The RAM grants 64 GB of DDR4, which compared to DDR3 provides more performance and reduced power consumption. ECC, stands for Error Correction Code and helps protect against data corruption, ECC is designed to be more stable than traditional RAM, but slightly slower.
The storage had to be enterprise grade SSD, as this will be running all the time I wanted the best value for money over the years and didn’t want to run into issues with wearout. SSDs offer much faster speeds compared to HDD and reduced power consumption but comes at a cost of smaller capacity.
The larger disks are primarily for used for media storage, Western Digital (WD) is a reliable product manufacturer and their red models are designed for NAS (Network Attached Storage) running 24/7, which is perfect for my use case.
Lastly the GPU is for Emby, because it supports Hardware Based Transcoding using a GPU can substantially reduce the CPU load.
Firmware
As this was a new motherboard for me I wanted to make sure that it was using the latest BMC firmware and BIOS, this is highly recommended but often overlooked. Firmware brings stability, security and bug fixes.
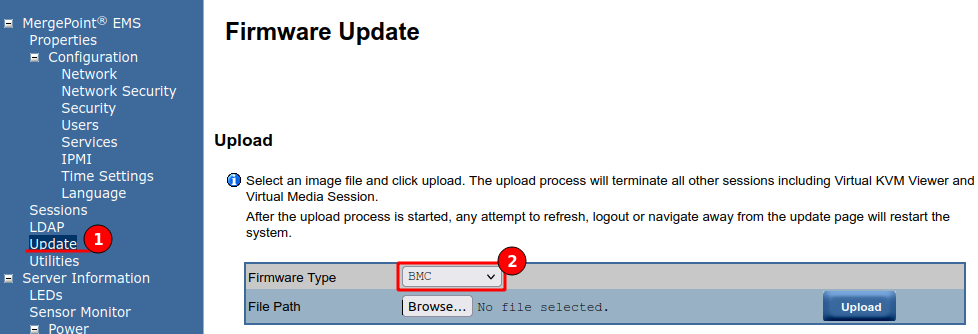
These upgrades are straight forward and both can be performed via the EMS (Embedded Management System), my Gigabyte board uses MergePoint EMS but this is the same as DELL’s iDRAC or HPE’s iLO if you have ever used those. Start by downloading the latest firmware and BIOS from the manufacturers website:
Navigate to the “Update” menu, select the firmware type and provide the extracted file.
vKVM Viewer
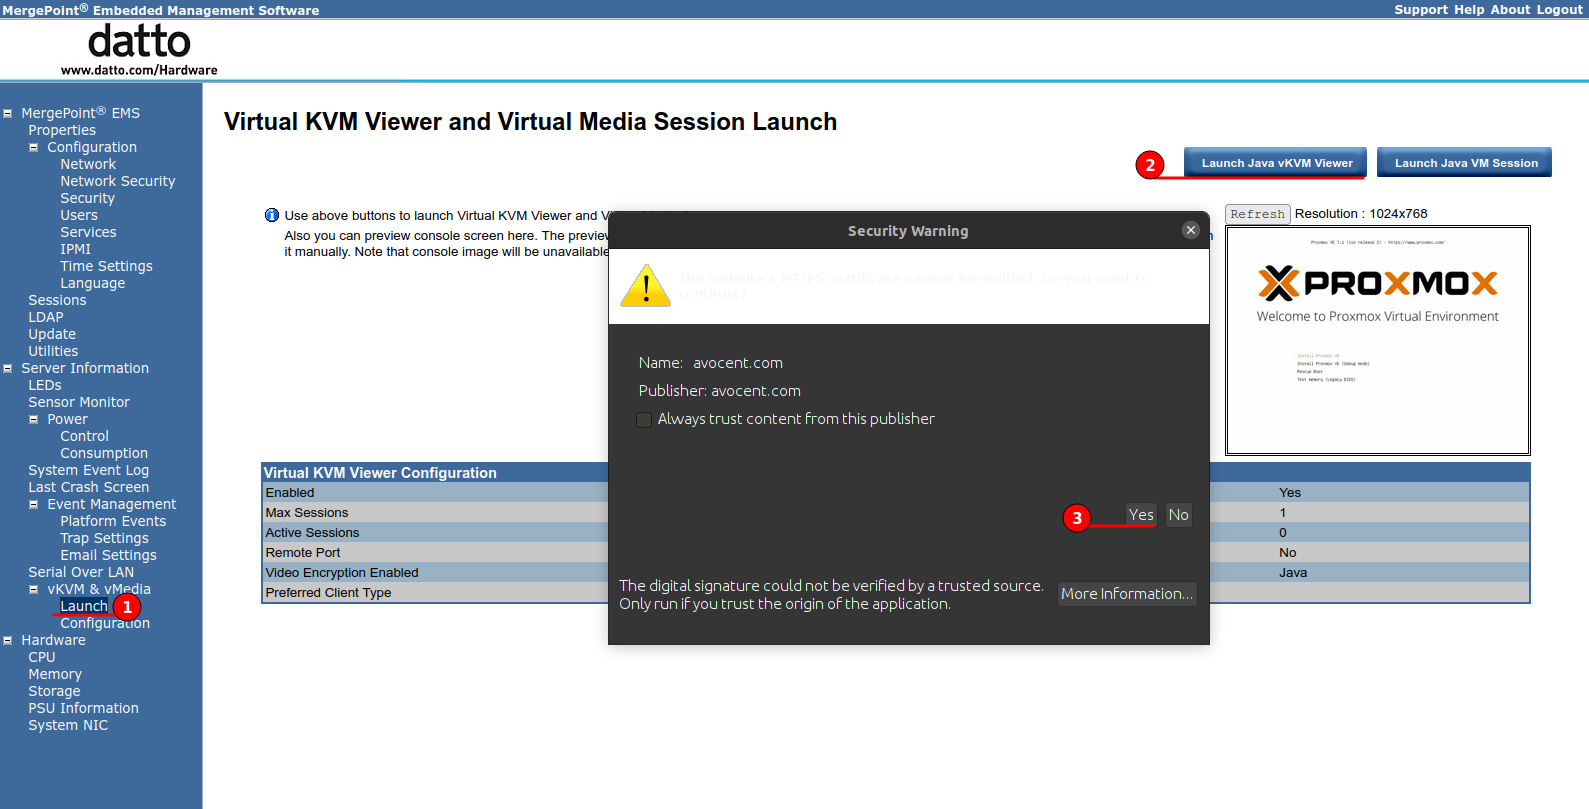
This motherboard doesn’t support the newer HTML5 vKVM, therefore I needed to use Java, which is often unsupported in modern browsers.
As I use Linux for my desktop environment I was able to install “IcedTea-Netx” to enable use of t Java vKVM Viewer. You can install this on your Debian based system using the below command.
sudo apt install -y icedtea-netx
Once installed navigate to the vKVM launch menu and then accept the security warnings, you can check the “Always trust” to remove these warnings in the future.
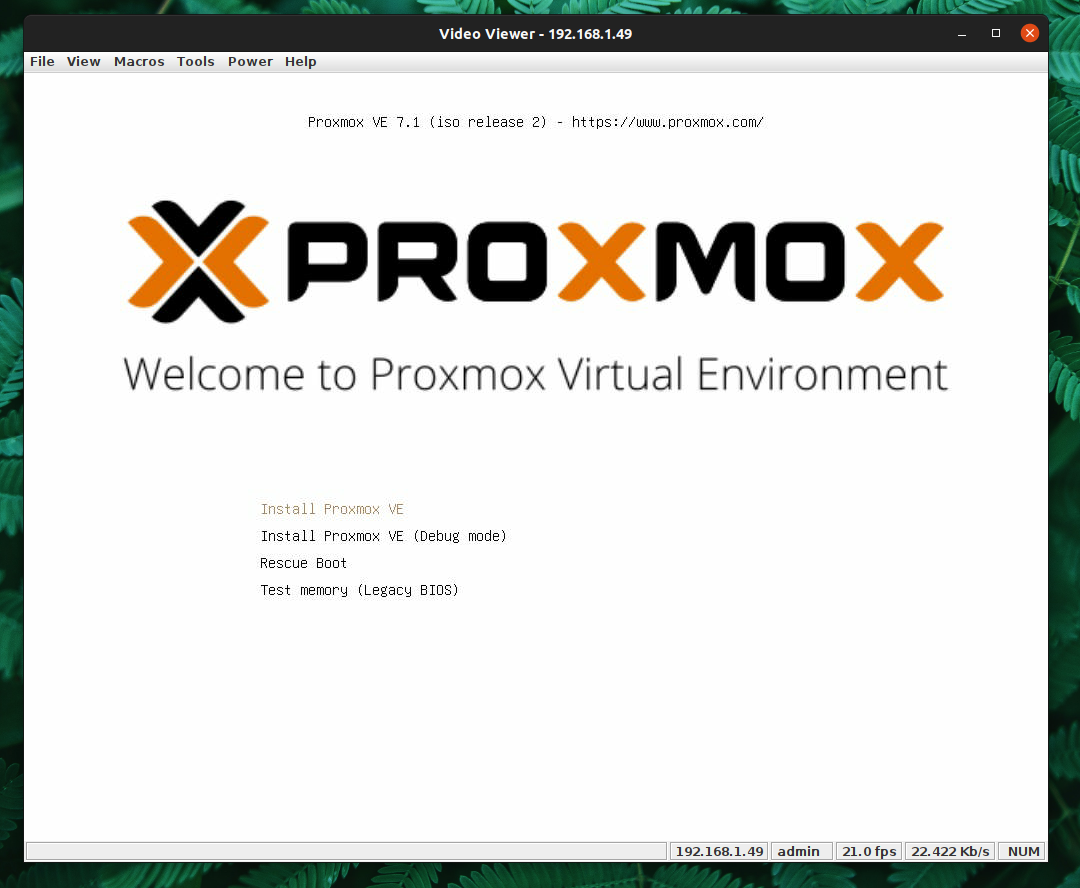
The figure below shows the vKVM viewer working, the server is powered on and waiting with my Proxmox USB installation media inserted.
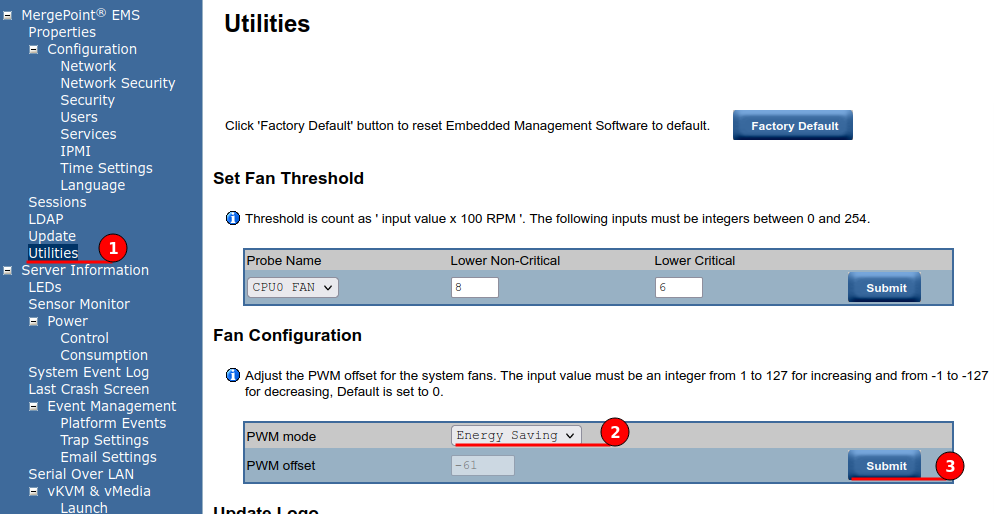
Fan Configuration
I could configure the motherboard BIOS to run in an energy efficient mode from the BIOS menu, but needed to configure my fan array to be in an “Energy Saving” mode from the EMS, this not only reduces the power consumption but also reduces the noise without removing cooling potential. Navigate to Utilities and under PVM node set “Energy Saving” and submit, these changes will apply instantly.
Proxmox
Installation
Proxmox has a super easy installation process, which I will not cover in a step-by-step approach.
Storage is the only thing worth mentioning, its highly recommended to install the operating system onto a fault tolerant storage option such as using RAID1 or RAID10, this will ensure data is mirrored to another disk, protecting from hardware failure.
- RAID 1 - Mirror - Requires 2 disks, protects against a single disk failure.
- RAID 10 - Mirror Stripe - Requires 4 disks, protects against two disk failure and improves performance.
As mentioned server chassis has two SSD SATA disks in the back, I have used a ZFS RAID1 with these disks for my operating system.
CPU Governance
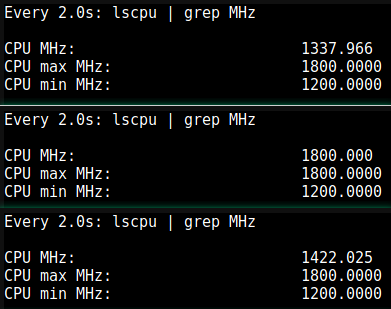
In the effort to save energy Proxmox’s default CPU power governors can be changed from “Performance” to “Powersave”, this combined with Intel pstate we should be able to optimise our performance compared to energy cost savings.
To start open a shell on Proxmxox and using the below command we are able to view the CPU freqency:
watch "lscpu | grep MHz"
As shown in the figure below we observe CPU MHz, my CPU choice is already a low power option so I do not see a huge benefit.
To see available options, use the below command
cat /sys/devices/system/cpu/cpu0/cpufreq/scaling_available_governors
Options include:
- conservative
- ondemand
- userspace
- powersave
- performance
- schedutil
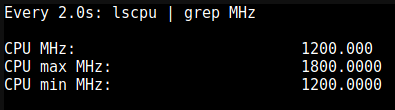
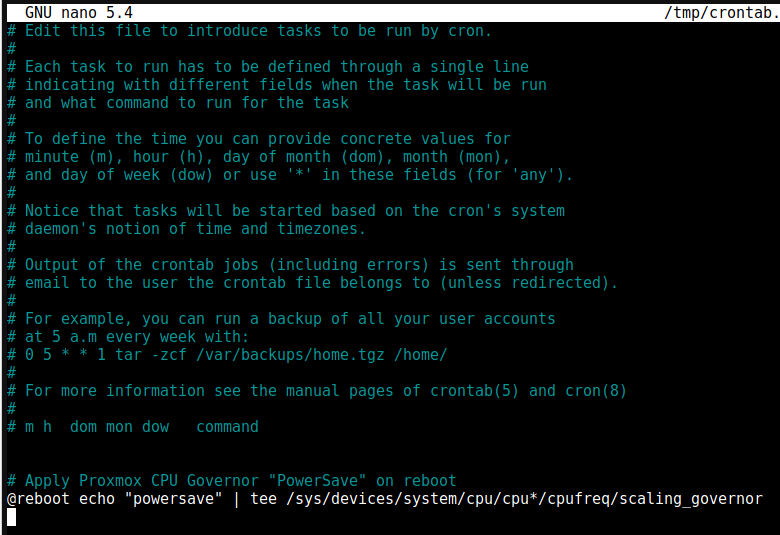
To apply an option to all CPUs we can use the below command then observe the CPU MHz again
echo "powersave" | tee /sys/devices/system/cpu/cpu*/cpufreq/scaling_governor
To make this change persist across reboots we will add a Cron entry using “@reboot”.
crontab -e
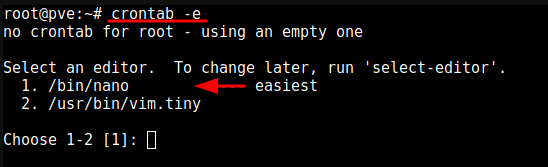
I have selected to use “Nano”, then add the following line, save (Ctrl + O) and exit (Ctrl + X).
“The job defined by this string runs at startup, immediately after Linux reboots.” - https://phoenixnap.com/kb/crontab-reboot
@reboot echo "powersave" | tee /sys/devices/system/cpu/cpu*/cpufreq/scaling_governor
Network Interfaces
I will be using both Ethernet ports in a LAG configuration, which will provide load balancing and fault tolerance. Its worth noting that the connected switch needs to support the feature and be configured.
At the time of writing my switch, which is a Netgear GS116Ev2 does not support IEEE 8802.3ad LACP but does support manual static LAG. - This is on the road map for change.
If your switch supports LACP (IEEE 802.3ad) protocol then it is recommended to use by using the corresponding bonding mode (802.3ad). Otherwise you should generally use the active-backup mode.
- Balance-RR
- Transmit network packets in sequential order from the first available network interface (NIC) slave through the last. This mode provides load balancing and fault tolerance.
- The striping often results in peer systems receiving packets out of order, causing TCP/IP’s congestion control system to kick in, often by re-transmitting segments.
- Active-Backup
- Only one NIC slave in the bond is active. A different slave becomes active if, and only if, the active slave fails. The single logical bonded interface’s MAC address is externally visible on only one NIC (port) to avoid distortion in the network switch. This mode provides fault tolerance.
- Balance-XOR
- Transmit network packets based on source MAC address XOR’d with destination MAC address modulo NIC slave count. This selects the same NIC slave for each destination MAC address. This mode provides load balancing and fault tolerance.
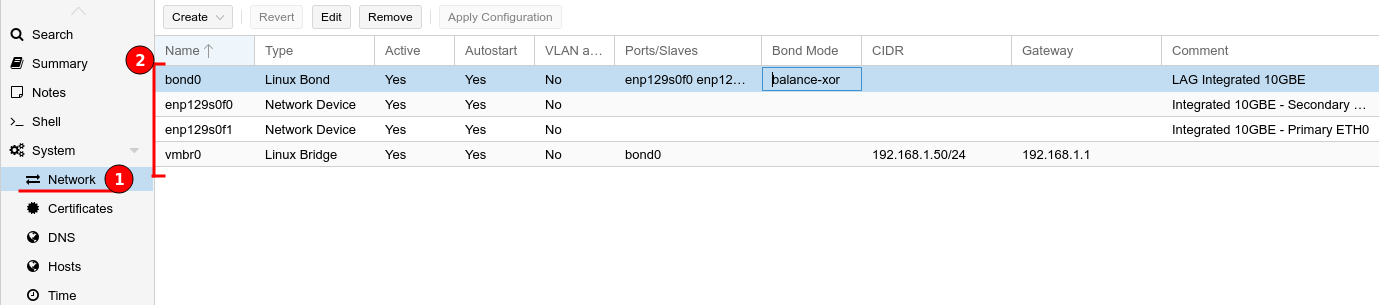
I will be configuring a Linux Bond in Balance XOR mode then attaching this to a Virtual Bridge, providing load balancing and fault tolerance. This process needs to occur in stages then apply the new configuration at the end.
- Remove the bridge ports from the default Linux Bridge “vmbr0”.
- Create Linux Bond, the first bond created will be called “bond0”.
- Add both interfaces as Slaves to the new bond, in my situation which was “enp129s0f0 enp129s0f1”
- Change the mode to “balance-xor”
- Set the Hash policy to “layer2”.
- Add “bond0” to the bridge ports for the Linux Bridge “vmbr0”.
- Apply configuration
The below figures help illustrate the above bullet points.
I have also enabled jumbo packets by modifying the MTU to “9000”, which also needs to be configured on each switch and device to be able to utilise it.

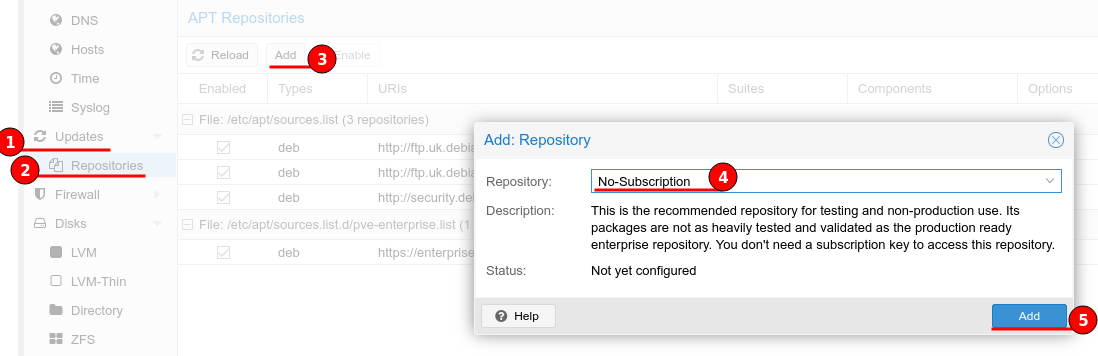
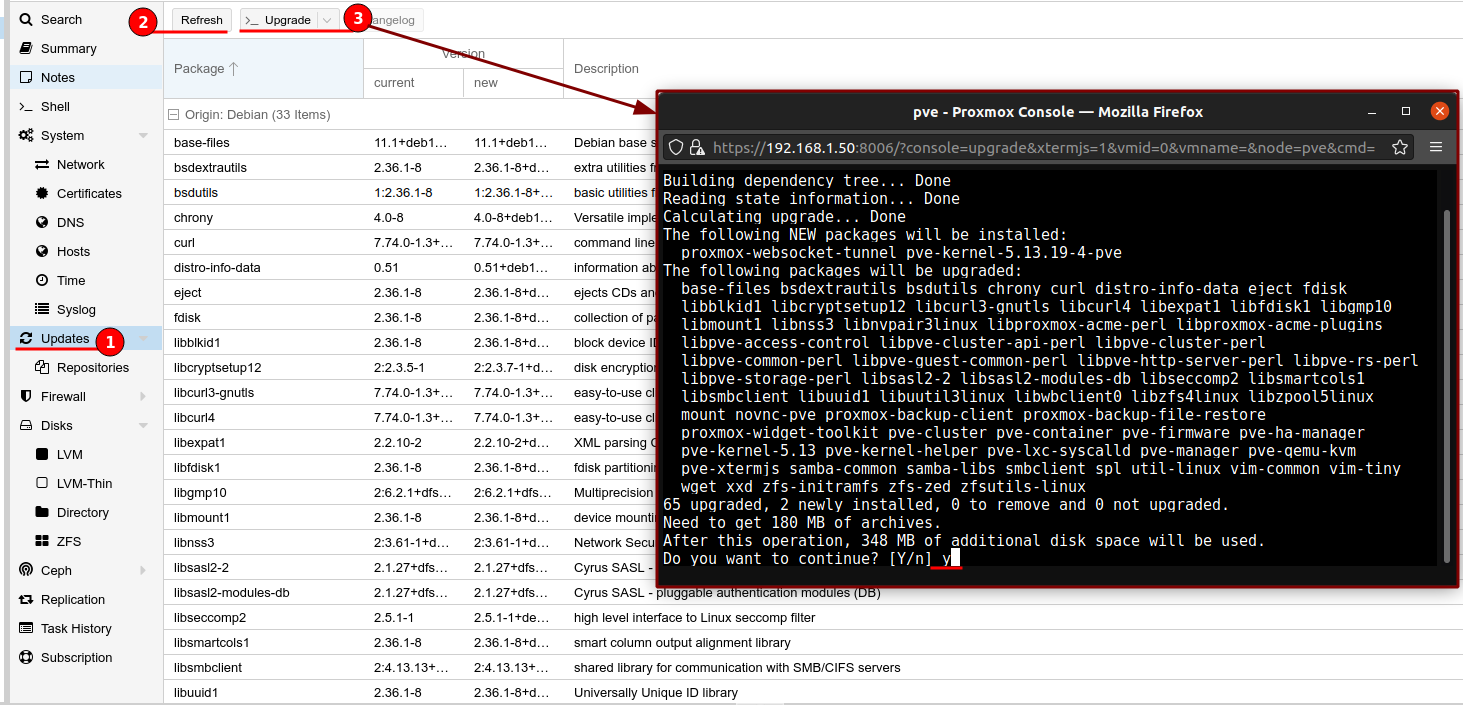
Repositories
The enterprise repository is only available for a licensed Proxmox installation, if this was for production I would highly recommend buying a license as this supports the project and includes a support contract. As this installation is for home usage and self learning I couldn’t justify €190 (for 2 sockets) per year just for the enterprise repository.
Lucky Proxmox is available for free and we can use the “No-Subscription” repository.
To add the “No-Subscription” repository, navigate to Updates > Repositories and click the “Add” button. Change the drop-down menu to “No-Subscription” and click “Add”.
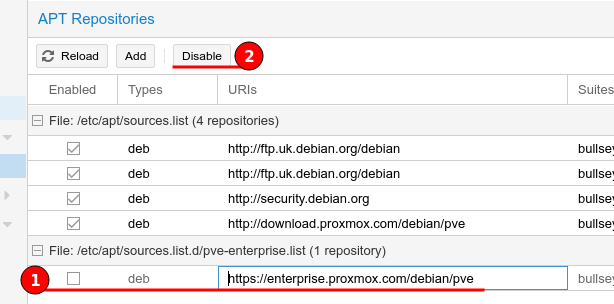
Now select the Enterprise repository and click the “Disable” button at the top.
Lastly go to Updates then click “Refresh” to update our repository list then click and “Upgrade”, which will upgrade all installed software packages.
This is the same process as performing apt update and apt upgrade on a Debian based Linux system.
Custom NTP server
As of Proxmox VE 7, chrony is used as the default NTP daemon, to add our custom NTP server we need to edit the conf file and restart the service.
nano /etc/chrony/chrony.conf
Add your server, an example is below.
# Include configuration files found in /etc/chrony/conf.d.
confdir /etc/chrony/conf.d

# Custom NTP servers
server 192.168.1.1 iburst

# Use Debian vendor zone.
pool 2.debian.pool.ntp.org iburst
Restart chrony
systemctl restart chronyd
Check the journal to confirm that the newly configured NTP servers are being used
journalctl --since -1h -u chrony
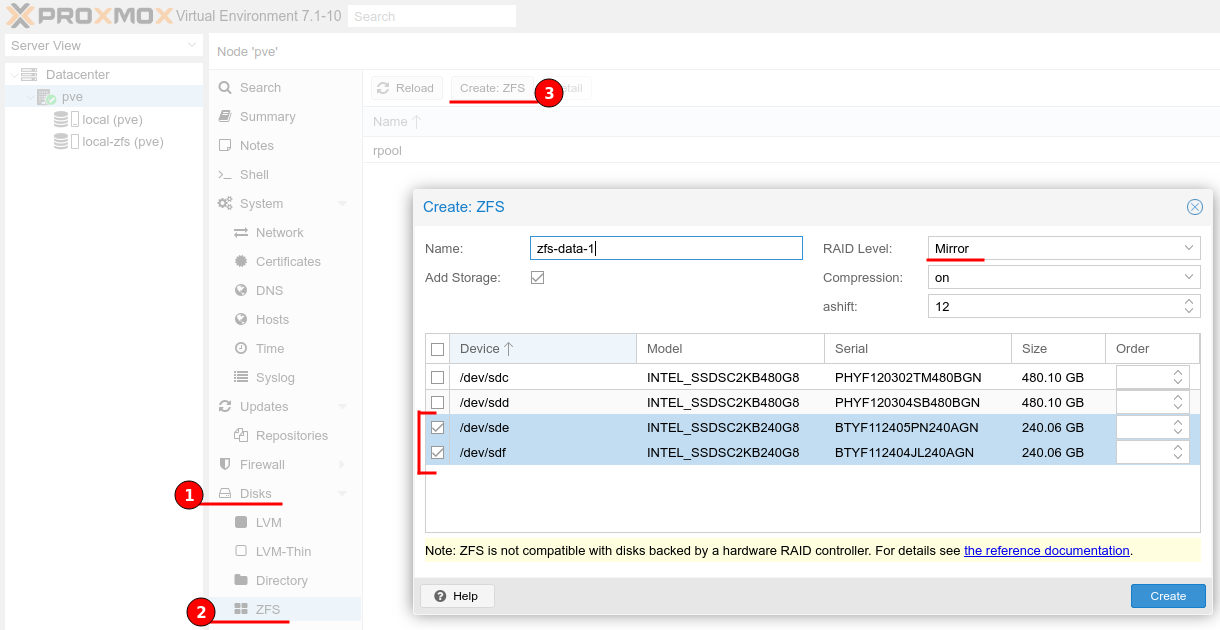
Create ZFS
To utilise the other SSDs I will be creating additional ZFS pools.
- ZFS-Data-1 = RAID1 (Mirror) of the two smaller drives.
- ZFS-Data-2 = RAID1 (Mirror) of the two larger drives.
As shown in the figure below, first navigate to the Proxmox server, then Disks > ZFS and click the “Create ZFS” button at the top.
Here we can provide our ZFS name, raid level and the disks we wish to include.
TrueNAS
TrueNAS Core is a storage OS, that is free and open-source. It is built upon OpenZFS and provides enterprise level features with an easy to use Web UI.
TrueNAS requirements
TrueNAS is based upon FreeBSD and the official documentation states the minimum requirements to be:
- 2-Core Intel 64-Bit or AMD x86_64 Processor
- 16 GB of RAM Memory
- 16 GB Boot Drive (SSD Encouraged)
TrueNAS will use all available RAM for caching, therefore if you can provide more then do so, this will aid with performance but do not over provision.
VM creation
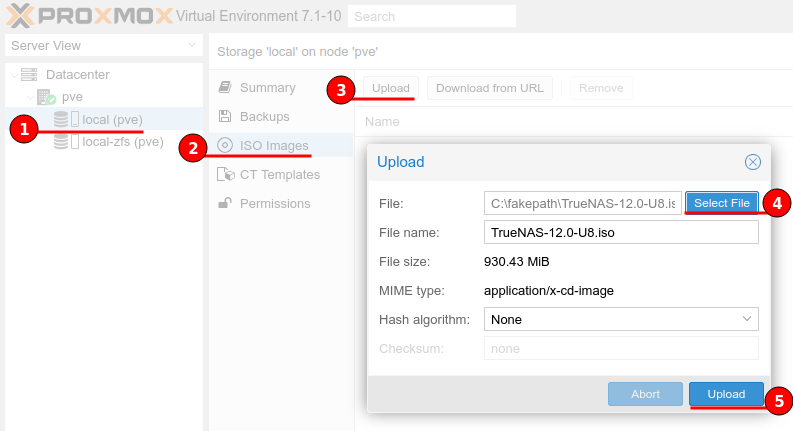
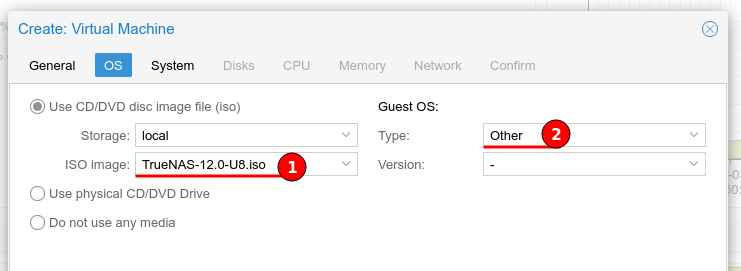
Download the latest ISO from the TrueNAS website and upload it to your Proxmox ISO images as shown in the figure below.
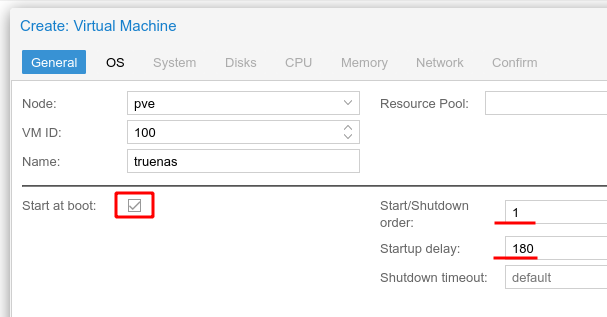
Now we will create a new Virtual Machine (VM), I have included a step-by-step screenshot guide below.

Ensure that start at boot is enabled, I have provided a Start/Shutdown order of 1 with a Startup delay of 180 to allow the TrueNAS VM to boot correctly, before starting any other virtual machines or containers, which may rely on TrueNAS storage.
As TrueNAS is FreeBSD based, set the Guest OS type to “Other”.
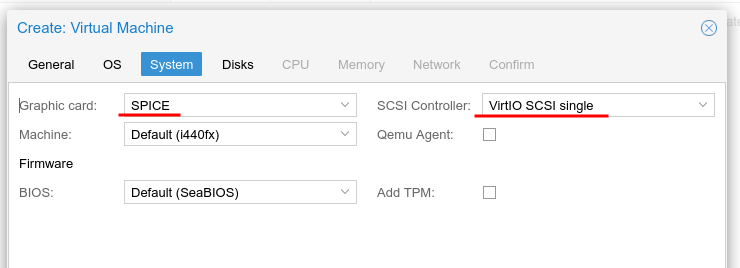
I have set the graphic card to use “SPICE” as this has a minor positive performance impact. The SCSI controller has been configured to VirtIO SCSI Single for best performance as per Proxmox documentation.
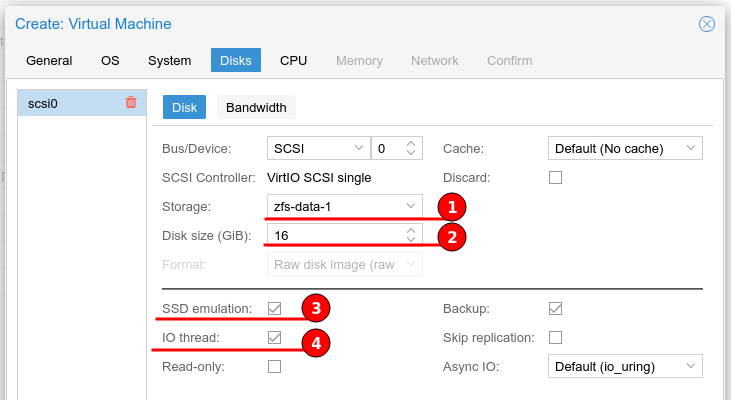
For the disks, following Proxmox documentation we will create a SCSI
- “A SCSI controller of type VirtIO SCSI is the recommended setting if you aim for performance and is automatically selected for newly created Linux VMs”
-
“If you aim at maximum performance, you can select a SCSI controller of type VirtIO SCSI single which will allow you to select the IO Thread option.”
- SSD emulation - “If you would like a drive to be presented to the guest as a solid-state drive rather than a rotational hard disk, you can set the SSD emulation option on that drive.”
- IO Thread - “Qemu creates one I/O thread per storage controller, rather than a single thread for all I/O. This can increase performance when multiple disks are used and each disk has its own storage controller.”
I have plenty of CPU threads therefore I have given 4 cores to my TrueNAS VM, I initially changed the type to “host”, to allow the CPU information to be passed through to the TrueNAS instance, but I found that this caused the TrueNAS VM to hang on reboots, I am unsure why this was happening.
For now leave Type to the default value.

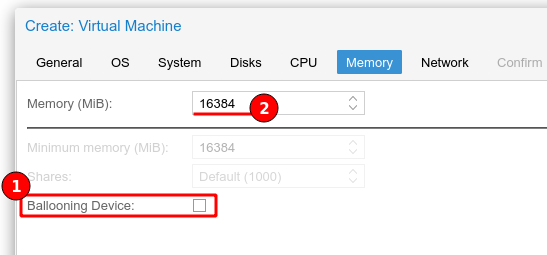
As per TrueNAS server requirements I have provided 16 GB (16384 MB) of RAM and unchecked the “Ballooning” feature as I do not want to dynamically allocate RAM due to performance implications.
EDIT: The recommendation is “even when using a fixed memory size, the ballooning device gets added to the VM, because it delivers useful information such as how much memory the guest really uses.”
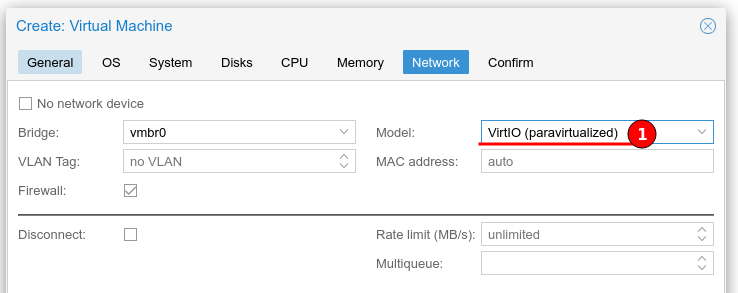
For best performance in networking the “VirtIO (paravirtualized)” option is recommended.
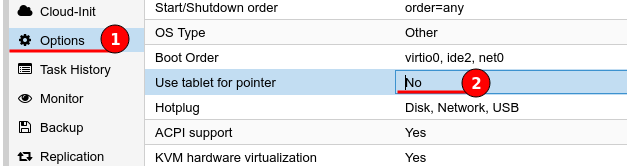
After the VM creation I have altered the options to remove the “Use tablet for pointer” option for a minor performance gain.
TrueNAS Installation
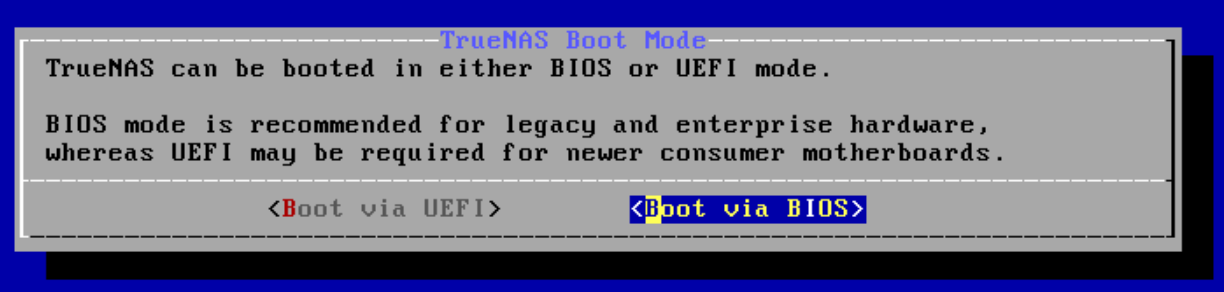
The TrueNAS installation is super easy and straight forward, the key part is the boot mode, as our Virtual Machine is using the default SeaBIOS then select “Boot via BIOS”, unless you configured UEFI for the VM.
Continue through the wizard until completion.

Add existing TrueNAS disks and import the pool
Ensure that the TrueNAS VM is powered off
On the Proxmox server use the below command to identify the disks on the host server, we’ll need this information to add the disks to our TrueNAS VM.
apt install lshw
lsblk |awk 'NR==1{print $0" DEVICE-ID(S)"}NR>1{dev=$1;printf $0" ";system("find /dev/disk/by-id -lname \"*"dev"\" -printf \" %p\"");print "";}'|grep -v -E 'part|lvm'

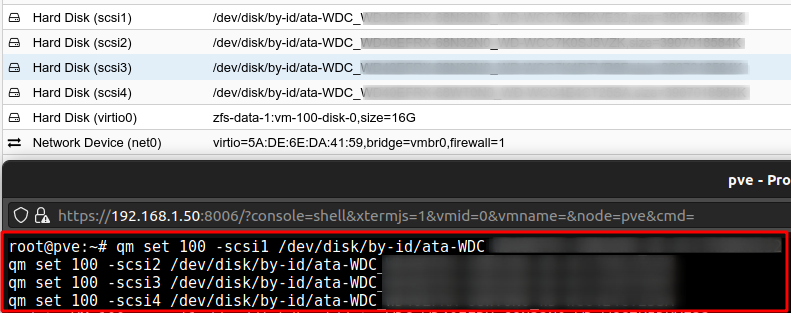
We’ll be using the disk ID, from the above output make a note of the disks then update the VM configuration by using the below command to add the disks.
qm set <VMID> -scsi1 /dev/disk/by-id/ata-xxxxxxxxxxx-xxxxxx_xxxxxxxx
The sample below is what I used to attach the 4 disks, I have replaced the serial numbers with “x”.
qm set 100 -scsi1 /dev/disk/by-id/ata-WDC_xxxxxxxxxxx-xxxxxx_xxxxxxxx
qm set 100 -scsi2 /dev/disk/by-id/ata-WDC_xxxxxxxxxxx-xxxxxx_xxxxxxxx
qm set 100 -scsi3 /dev/disk/by-id/ata-WDC_xxxxxxxxxxx-xxxxxx_xxxxxxxx
qm set 100 -scsi4 /dev/disk/by-id/ata-WDC_xxxxxxxxxxx-xxxxxx_xxxxxxxx
As shown in the figure below the command was issued and disks were added to my TrueNAS VM.
This is a good time to enable iothread on each disk.
Now we are ready to start the TrueNAS VM and continue with importing the storage pool.
Open the TrueNAS web UI and navigate to Storage > Pools, click “Add” and Import an existing pool
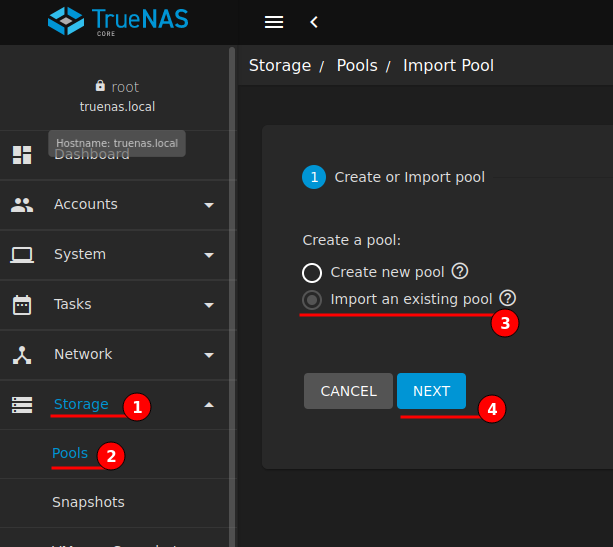
My storage pool does not have GELI encryption, therefore I select “No, continue with import”.
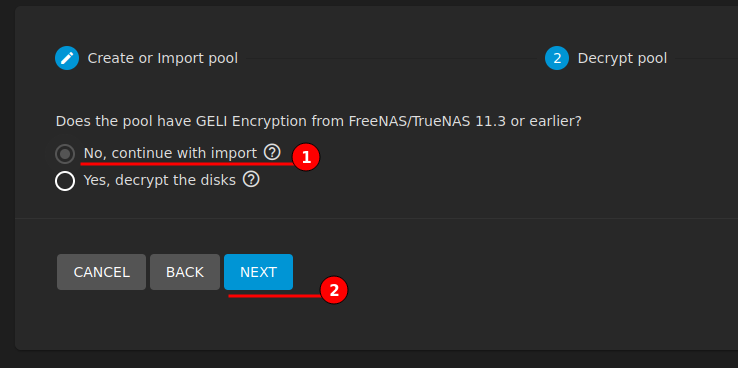
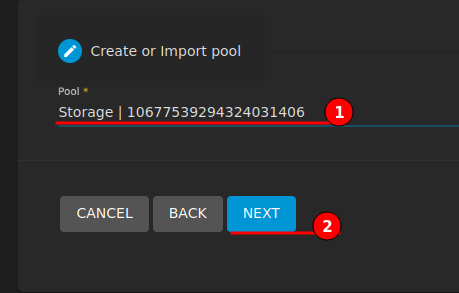
TrueNAS will scan and provide a drop-down menu of available storage pools to import. Select the available pool and continue through to completion with Storage Pool Importing.
Adding Hard Disk Serials
After the storage pool has been imported, you may notice that the disks have no serial information. We can add this as part of the VM configuration information.
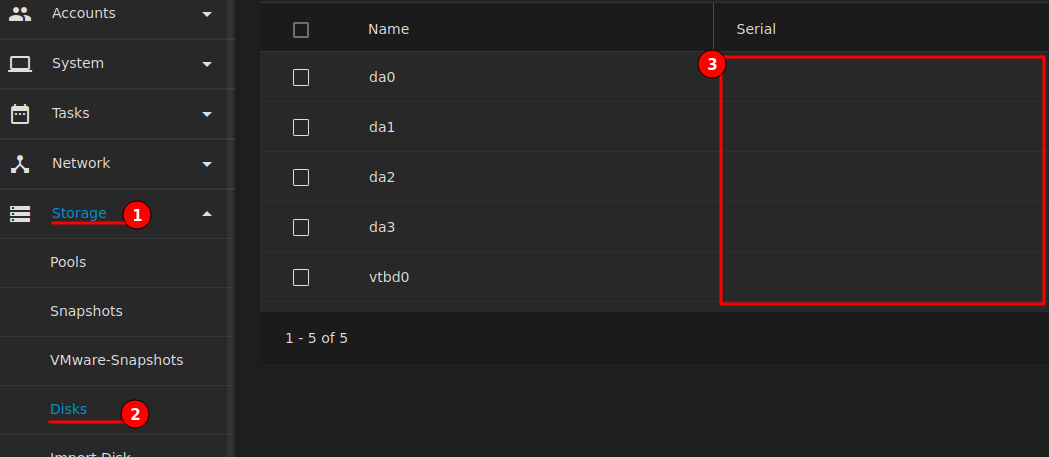
Ensure that the TrueNAS VM is turned off then install “lshw” on the Proxmox server.
apt install lshw
Use the below command to find the serial number of each disk and make a note of them
lshw -C disk
For best practice and just in-case something goes wrong make a backup of the VM configuration file
cp /etc/pve/qemu-server/100.conf /root/100.conf
Edit the VM configuration file
nano /etc/pve/qemu-server/100.conf
Add the serial information to the end of the disk information, as shown below.
scsi1: /dev/disk/by-id/ata-WDC_xxxxxxxx-xxxxxxx_WD-xxxxxxxxxxxx,size=3907018584K,serial=WD-xxxxxxxxxxxx
Save the file then start the VM and review, if everything worked correctly remove the backup conf file.
rm /root/100.conf

At this stage I require very little from TrueNAS except an NFS share for migration purpose from my old Proxmox to new.
Add Dataset to Storage Pool - Defaults are acceptable.
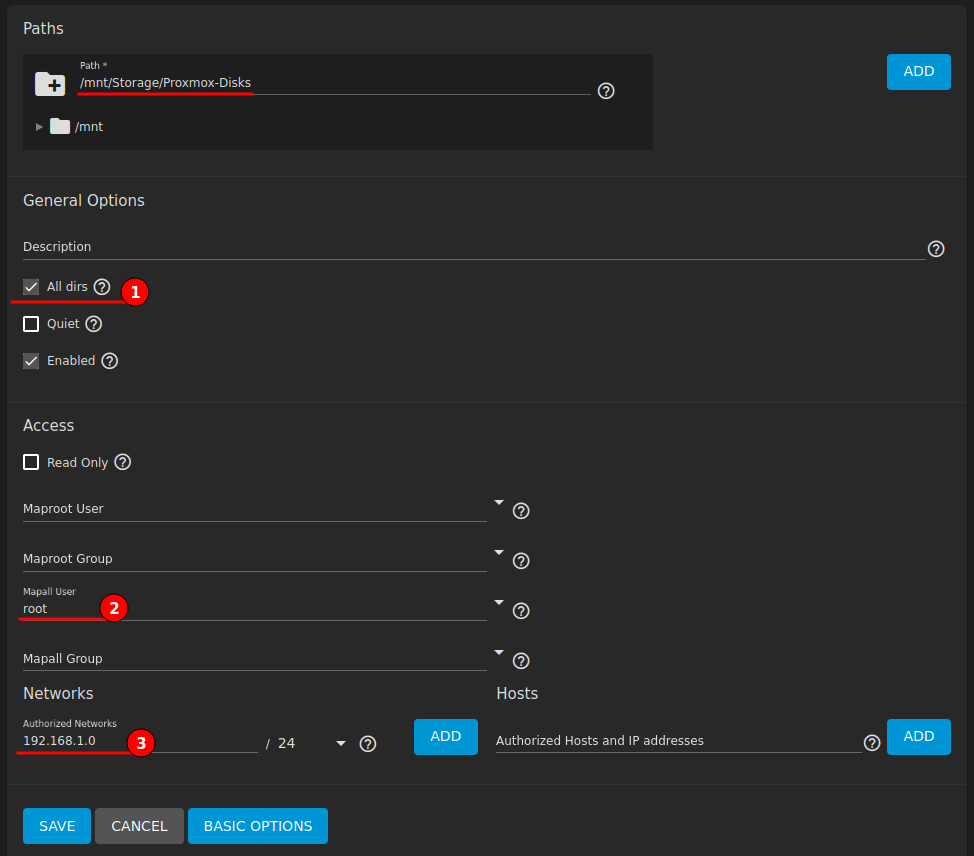
Create NFS share - check “All dirs” and under advanced map root to “Mapall User” for full control and set the “Authorized Networks”.
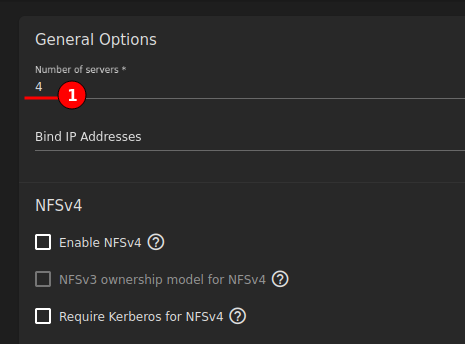
Edit NFS service, set “Number of servers” to match CPU count of TrueNAS.
Ensure service is started automatically.
Migrating Proxmox VMs and Containers
NFS for Backup and Restore
Now I am ready to begin moving over existing Virtual Machines and Containers from my old Proxmox installation. To achieve this I will be using TrueNAS with an NFS share to backup my VMs and Containers, then restore to the new Proxmox server.
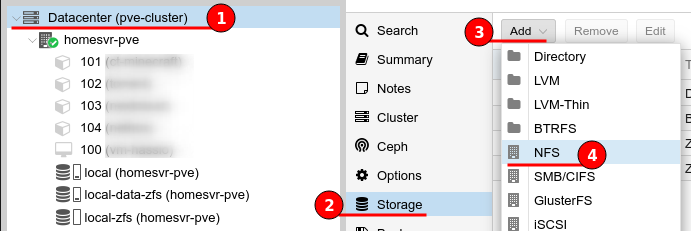
Attach the NFS share to both Proxmox servers. The figure below illustrates how to do this, first navigate to the Datacenter > Storage, select “Add” and choose “NFS” from the drop-down menu.
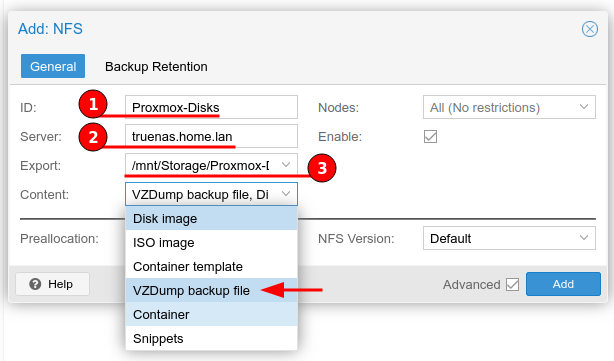
Provide an ID, this can be anything but I prefer to match the NFS share name. Next type the IP address or hostname of the TrueNAS server, this address is queried and the Export down-drop menu will be populated with the results.
The contents only needs to be set to “VZDump backup file” to perform backups, but I choose to leave Disk Image and Container selected, just in-case I wanted to use this move disks to shared storage.
With the storage in place, on the old Proxmox server, navigate to each VM or container and create a backup. I have already powered off the VMs and Containers I wanted, this helps with performance of the backup.
The figure below shows the steps to backup to the NFS share “Proxmox-Disks”.

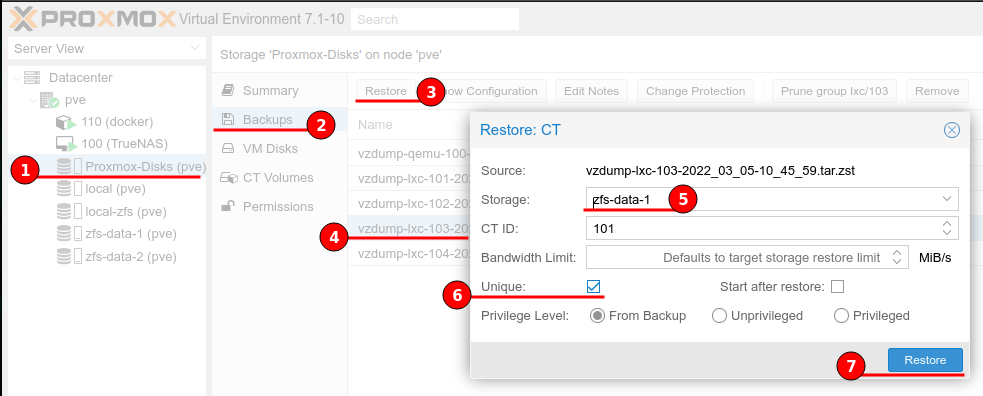
After backups have been created we can switch over to the new Proxmox server, select the “Proxmox-Disks” remote storage and select “Backups”. We should see all of the backups created from the old Proxmox server.

The figure below shows all of the steps required to restore a backup. From the list select the image and choose “Restore”, then set the restore storage location and check the “Unique” box to auto regenerate unique properties such as MAC address.
Once restored the VM or Container will be available to start, this is a good opportunity to review the machine settings and options before enabling.
Reattach an existing remote disk to a container
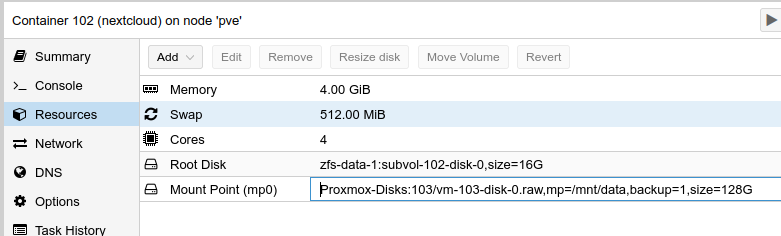
I had a Container (VMID 103) that had an additional drive on a remote location, as this was upgrade was “Everything new!” situation I had to detach the disk before backup. I then continued to restore the Container to the new Proxmox server, changing its VMID to 102.
To re-add the remote storage, which was now on the updated TrueNAS VM, I had to:
-
Ensure that the 102 container was turned off.
-
Open a Shell on the new Proxmox server
-
Make a backup copy of the configuration file
cp /etc/pve/lxc/102.conf /root/102.conf -
Edit the correct configuration file
nano /etc/pve/lxc/102.conf -
Add the following to add an un-used disk to the container
unused0: Proxmox-Disks:103/vm-103-disk-0.raw
The figures show the newly added Unused disk and configuring the mount Path.

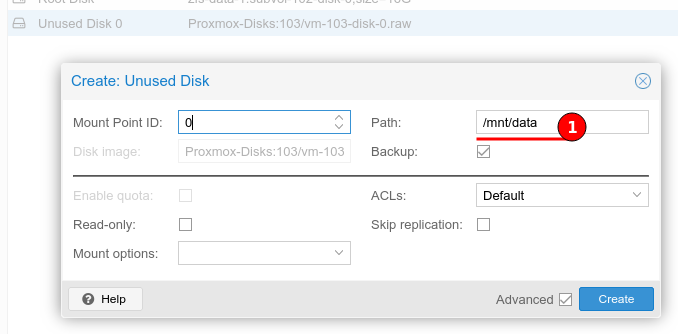
Once the Path has been added the disk will be mounted and the container is able to start.
Removing a node from a Cluster
The last thing I wanted to do with the old Proxmox server was remove it from the cluster. A brief background history, I had a 2 node cluster, but I am keeping the second node.
Removing a Node
The first step is to remove the node from the cluster, the following are the steps required:
-
Make sure all VMs and Containers have been migrated.
-
Log onto an active node and open a shell (or SSH)
-
Check nodes
pvecm nodes
-
Shutdown the nodes that will be removed
-
Execute the remove command
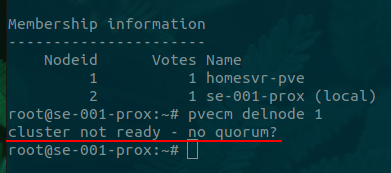
pvecm delnode <NodeID> -
Review nodes
pvecm nodes
The problem I had was because the cluster was expecting at least two votes I had a “no quorum?” error message
No Quorum?
“quorum - The minimum number of members required for a group to officially conduct business and to cast votes”
We need to ensure that the cluster is still functional after the node removal, otherwise the cluster will go into an active blocking node until a quorate state is met. Using the Proxmox Cluster Management command below we can see the cluster status.
pvecm status
With the cluster in active blocking no changes will be applied and our VMs and Containers will not start. We can force the cluster out of active blocking by altering the expected value to 1, which tells corosync that we only need a single host vote to be active.
Using the below command will alter this value, as shown by the figure.
pvecm expected 1
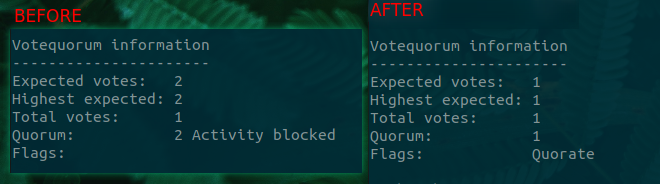
Now that our single node cluster is active we can continue to separate the node from the cluster completely.
Separate a Node Without Reinstalling
As per the Proxmox documentation “ensure that all shared resources are cleanly separated! Otherwise you will run into conflicts and problems.”
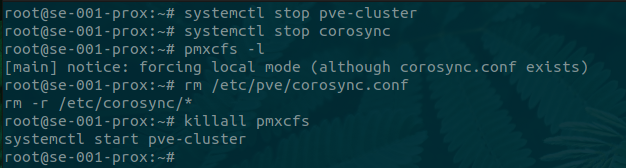
To separate the node from the cluster and run it locally we need to do the following steps:
-
Stop the corosync and pve-cluster services
systemctl stop pve-cluster systemctl stop corosync -
Start the cluster file system again in local mode
pmxcfs -l -
Delete the corosync configuration files
rm /etc/pve/corosync.conf rm -r /etc/corosync/* -
Start the file system again as a normal service
killall pmxcfs
systemctl start pve-cluster
The below figure shows these commands being issued.
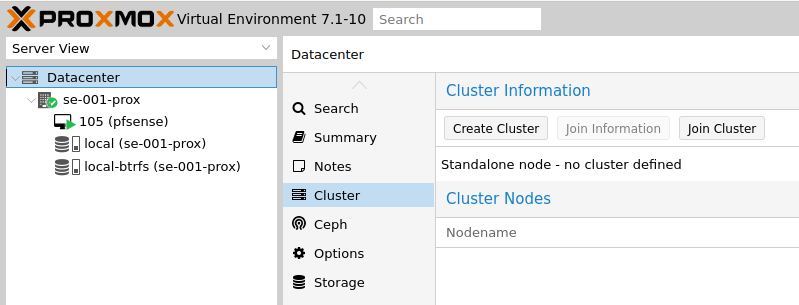
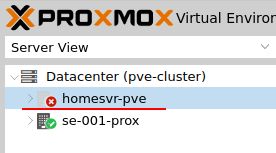
When we revisit the web interface the other clustered node will be gone and cluster information will state “Standalone node - no cluster defined”.