RPI Zero W Cam Web Interface
27 Nov 2022
RPi Cam Web Interface is a web interface for the Raspberry Pi Camera module. It can be used for a wide variety of applications including surveillance. It is highly configurable and can be opened on any browser, smartphones included.
I will be using this software to integrate some Raspberry Pi Zero Ws into my Home Assistant instance.
Install Raspbian on your RPi
I’d recommend flashing using the Raspberry Pi OS Imager tool, this way you can use the advanced options to set:
- Hostname,
- Enable SSH,
- Default user,
- Wireless settings,
- Locale.
You can use another tool such as Disks or Etcher, or you can manually flash your MicroSD card.
To manually flash the SD card:
-
Download the latest Raspberry Pi OS Lite
-
Open terminal and find your MicroSD card
sudo fdisk -l -
flash the SD card
sudo dd if=<IMAGE> of=<DISK> bs=2Msudo dd if=Downloads/2022-09-22-raspios-bullseye-armhf-lite.img of=/dev/sda bs=2M
Note: If you are connecting to a hidden network you’ll need to ensure that you have scan_ssid=1 within your wpa_supplicant.conf file, an example below.
update_config=1

network={
 ssid="network_ssid"
    scan_ssid=1
 psk="network_password"
}
Enable camera support
Run the raspi-config tool.
sudo raspi-config
Select option 3 Interface Options followed by I1 Legacy Camera and enable.
Now restart the Raspberry Pi.
Update your RPi
Update and Upgrade your Raspberry Pi.
sudo apt-get update

sudo apt-get -y upgrade
Installation
Ensure you have Git installed, the Raspberry Pi Lite OS does not have this by default.
sudo apt-get install -y git
Clone the GitHub repository
git clone https://github.com/silvanmelchior/RPi_Cam_Web_Interface.git
Now run the installation script
bash RPi_Cam_Web_Interface/install.sh
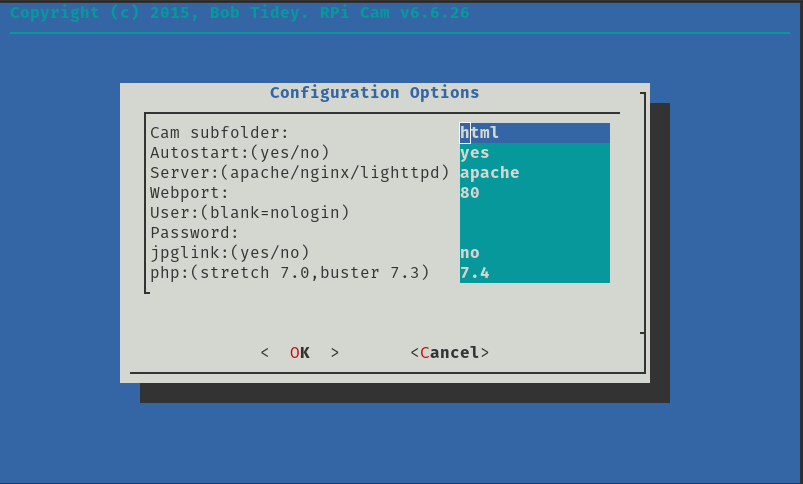
You’ll be presented with a Configuration Options page, I will be configuring my setup with the following:
- Cam Subfolder: html
- Autostart: yes
- Server: lighttpd
- Webport: 80
- User: admin
- Password: password
- JpgLink: yes
- PHP: default value
After the installation is complete, start the camera now then browse to your Raspberry Pi in your perferred browser.
Configuration
Under the Camera Settings I have loaded the preset “Max View 972p 4:3” and flipped the image in both directions.
To enable motion detection on startup, change to the schedule settings and add “md 1” in the Period Start box. I also set the “Purge Space Mode” to “Minimum Space %” and set to “5” so the storage will be recycled when this threshold is met.
Turn off the camera red LED
sudo nano /boot/config.txt
Add the following line
disable_camera_led=1
Save and reboot.
Home Assistant Integration
Add a generic camera component.
- platform: generic
  still_image_url: http://192.168.1.111/cam_pic.php
  username: USERNAME
  password: PASSWORD
  name: Location
Add a card and change its settings to have a “Live” camera view.
I also changed mine to a fixed aspect ratio of “4:3” with “Show Name” and “Show State” off.